
How to Set Up WriteShop Junior – A Homeschool Writing Curriculum
I earn a commission from products purchased through links in this post.
The WriteShop curriculum can feel a bit overwhelming when the box arrives in the mail. You might be wondering how to set up WriteShop Junior. This writing curriculum does require a bit of prep work from the teacher. It is absolutely worth it, though. It has quickly become a favorite homeschool writing curriculum in my house.
Taking an evening or two to set up WriteShop Junior will help your writing lessons go smoothly all year long. You won’t have to skip parts of lessons because you can’t find the correct supplies.
Everything you need to successfully teach this awesome homeschool writing curriculum will be right at your fingertips.
How to Set Up WriteShop Junior: An Awesome Homeschool Writing Curriculum

WriteShop Junior contains 10 lessons per level. Each lesson will take 2-3 weeks to complete, depending on your pacing. Ben is working on WriteShop Junior level D this year, and I allotted 3 weeks for each lesson. This gives me a little extra room in case of illness or a spontaneous trip to visit grandparents.
This is how I set up WriteShop Junior.
1. Set up an accordion folder with a pocket for each lesson
The full WriteShop Junior homeschool writing curriculum includes:
The activity pack contains both the fold-n-go grammar pack and the worksheet pack. This is where you will find all of the necessary student papers for each lesson. The activity pack is required for the WriteShop curriculum.
The time-saver pack is technically optional, but I highly recommend it. Here you will find ready-made props for lesson activities. Only skip this pack if you are sure you have the time and energy to create these resources yourself.
I think spending a little more to include this pack is worth the time saved preparing activities.
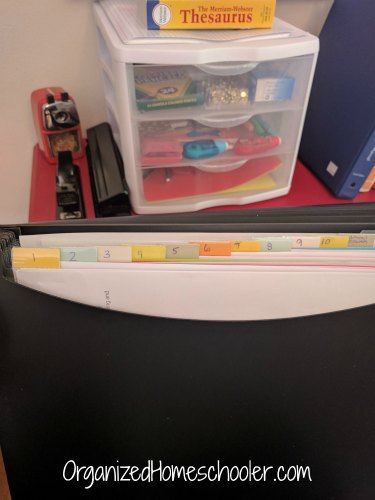
I organized my fold-n-go grammar, worksheets, and time-saver resources in an accordion folder to make weekly prep as efficient as possible.
Label the divider tabs 1-10. Now you have a spot to store all of the papers and supplies for each lesson. I also labeled the very last divider ‘additional resources’. This is where I file reading logs, evaluation charts, and answer keys.
Fold-n-go grammar

You can either assemble the grammar folders all at once or before each new lesson.
I found that the assembled folders did not fit well in my accordion folder. The tabs were being bent, and that grated on my nerves. It only takes a few minutes to assemble the folders, so I will just do that before each lesson.
Instead, I store the pages of the fold-n-go grammar guides in the correct section of the accordion folder.
Each fold-n-go grammar lesson includes bookmarks that highlight grammatical principles. I laminated those for extra durability.
Worksheets
File the worksheets behind the appropriate lesson tab of the accordion folder.
Occasionally there is advance prep, but that is clearly listed in the teacher’s guide. I like to do all of the advance prep for a month at once. It is a good time-saver activity to do while watching Netflix at night.
Time-savers
These time-saver props are also stored behind the appropriate lesson tab. If there are any small pieces, store those in Ziploc bags so nothing is lost. I label all bags with the lesson number so I can put it back in the right spot if it falls out of the folder.
2. Stock a writing center

A 3-drawer organizer is the perfect way to create a writing center. The writing center lives in my dining room, aka school room, on a side table near our writing area. I wanted it to be near where we typically write so it is easily accessible.
I have divided my organizer into three parts – prewriting, editing, and publishing.
Prewriting
I store all of our prewriting and first draft supplies in the top drawer.
- Pencils
- Colored pencils
- Brass paper fasteners
- Paper clips
- Index cards
Editing
Editing is the hardest part of the writing process for my kids. Having a drawer dedicated to the right supplies makes this task a little easier.
- Highlighters
- Extra erasers
- Correction tape
- Stickers
- Reinforcement labels
- Post-it notes
Publishing
Publishing and finishing a writing project can be fun. This is the stage where Hannah and Ben get to create their finished draft.
- File folders
- Glue sticks
- Hole punch
- Scrapbook scissors
I have found that standard 8 x 11.5 paper does not fit well in these drawers because they are so full with other writing utensils. Instead, I keep card stock and printer paper in a file folder on top of the writing center. WriteShop highly recommends students learn to use a Thesaurus, so this also lives on top of the writing center.
Everything we need to complete the WriteShop homeschool writing curriculum is within easy reach.

I hope this article helped you set up your WriteShop Junior writing curriculum.
As an Amazon Associate I earn from qualifying purchases.
Keep reading . . .